Wednesday, March 30, 2016

Into the Woods...

Today we have a card from Crafty Debs
Debs
I rather like the technique that Debs has used for her background, and she has used a product to do it that I would not have thought of using, and I do have a stash of it! Can you guess?
Debs1
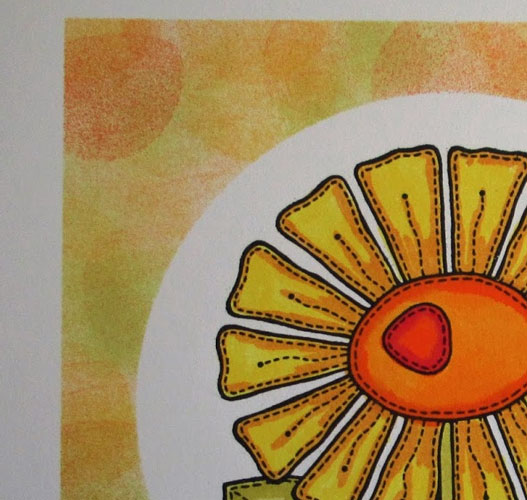
Crafty Debs has used a piece of Cling Too Mounting Sheet and cut it into 2 inch squares, with the help of a punched template, this will stick to you acrylic block and then debs has used it as a stamp with some Chalk Ink Pads, the chalk ink gives you a nice mat finish. The stamps is Into the Woods designed by Jane, the greeting comes from the same stamp set.
Debs has finished off the design by drawing a nice wiggly line around the edge with a Micron Pen, and adding Glossy Accents to the stamens.
Crafty Debs has got carried away with the idea and has made a totally different card with he same stamps and feel to it, so pop over and take a look on her blog.
Thanks for visiting see you soon!

Monday, March 28, 2016

What a lovely Bunch of Flowers

Jane the Flower Girl today, with a lovely bunch of flowers for us
Jane
Jane has stamped her Walking Boots Clear Magic stamp with black ink on white card, then used the Woodware Mask-it sheet but rather sneakily has only stamped the top of the boots and cut out that portion of the stamp as that is all that she needed masked.
Jane1
The flowers are part of the walking boot stamp set (so Jane must have had this in mind when she designed the stamp) but the stems have just been hand drawn, they don't have to be perfect, they can be quite random, with the mask in place you can be free with your drawing and not worry about going over the boots, or you could use flowers with stems from a different stamp set.
The flowers have been stamped with the Kaleidacolor Autumn Leaves pad and the books coloured to match.
The background papers come from the Perfect Prints Dark Dots 6 x 6 pad
If you pop over to the Jane the Flower Girl you will find pictures showing you more detail of the masking.

If you can't find Woodware stamps why not ask your local store about them they can find them all on the Woodware web-site.

 or  Woodware Stamps are available from Notions Marketing in the US check with them for your nearest stockist.    

Thanks for visiting see you soon!

Sunday, March 27, 2016

Winter time Masking


Today we have a masking technique from Kim
Kim2
Kim has used a very expensive mask... a ripped paper!
Kim
Kim has used some paper and dye inks to create a snowy landscape. You can see the Berries and Branches 1 peeping through the snow
Kim1
The moon has also been masked with a punched circle. After it was finished Kim has sprinkled water on and blotted it dry to represent snowflakes. The Stickles around the border adds to the wintery feel of the card.
I hope that this is the only place that I see snow this week! but it is indeed a lovely card and very clever use of masking.


If you can't find Woodware stamps why not ask your local store about them they can find them all on the Woodware web-site.

 or  Woodware Stamps are available from Notions Marketing in the US check with them for your nearest stockist.   

Thanks for visiting see you soon!

Wednesday, March 23, 2016

Woodware Masking Ideas

Today we have a card with a masking idea for you from Crafty Debs
Debs
I love the clean crisp look of this card from Debs. The stamp on of the Francoise Collection Marguerite Patch Clear Magic.
Crafty Debs has punched a large circle and centred it on her white card, Debs has used the Zig 2 way Glue to temporarily stick the mask in place.
Debs1
Crafty Debs then used stencil tape to mask off the edges of the card, giving her a space to add colour. Crafty Debs has used the Blend-it tool and Dye inks from ColorBox to colour her background.
A  very simple, but very effective mask, and very neatly done.


If you can't find Woodware stamps why not ask your local store about them they can find them all on the Woodware web-site.

 or  Woodware Stamps are available from Notions Marketing in the US check with them for your nearest stockist.   

Thanks for visiting see you soon!

Thursday, March 17, 2016

Woodware Daisy Layers for Wearing!

Today we have a lovely project from Gill
Gill2
Gill has used Translucent Shrink Plastic, this gives a soft look on the finished project. The stamps are the Daisy Layers Clear Magic stamps designed by Jane Gill.
On a sanded sheet of Shrink Plastic Gill has stamped five of the largest flowers.
Gill
Gill has coloured her flowers with coloured pencils and cut them out, three for the bracelet.
Gill1
and of course 2 for the earrings!
Remember to punch your holes in the flowers before you shrink them!
Gill has full instructions on her blog, Gills Crafty Journey.

If you can't find Woodware stamps why not ask your local store about them they can find them all on the Woodware web-site.

 or  Woodware Stamps are available from Notions Marketing in the US check with them for your nearest stockist.   

Thanks for visiting see you soon!

Wednesday, March 16, 2016

Fabric Patch Daisy

Today we have a t-shirt, !
Debs
Crafty Debs, our award winning gardener has made this t -shirt to garden in, but it is far too nice to mess up, so I hope that Debs s a clean gardener!
Debs1
Crafty Debs has paper pieced with fabric, if that makes sense, I suppose it is really just be called applique! Debs has stamped Francoise's Daisy Patch Clear Magic stamp three times on different patterned fabrics, and then cut around them, use iron on adhesive on the back of the fabric before you start to prevent the fabric from fraying. Debs has stamped with Crafter's ink, which is heat set and so permanent when you iron on your flowers. Debs has stitched some buttons in the centre to finish off the flowers.
I love the way that Debs has put the patterns back together to create truly patch daisies!

If you can't find Woodware stamps why not ask your local store about them they can find them all on the Woodware web-site.

 or  Woodware Stamps are available from Notions Marketing in the US check with them for your nearest stockist.   

Thanks for visiting see you soon!

Monday, March 14, 2016

Roger Robot

Jane2
Well you may have seen him before,
Jane
but this time he is in miniature. Jane has designed Roger with his limbs separate, so that he is perfect for this sort of project. Jane has used white shrink plastic and stamped with a permanent ink.
Jane1
The shrink plastic is really easy to cut out before it is shrunk, any mistakes get shrunk too! Jane has added some shading with a Sakura Colouring Pencil then punched punched the holes with a regular hole punch, the holes will shrink too!
Jane's top tip for shrink plastic is to use your anti static pad to dust over the image before shrinking with your heat tool, to stop it sticking to it's self.
Jane has put all of the pieces together with jump rings.
Jane has mounted Roger on some punched card only attaching the head and body, then added a badge back to the back of the card.
If you can't find Woodware stamps why not ask your local store about them they can find them all on the Woodware web-site.

 or  Woodware Stamps are available from Notions Marketing in the US check with them for your nearest stockist.   
Thanks for visiting, see you soon!